Click Here For Free World Fitness Magazine Subscription
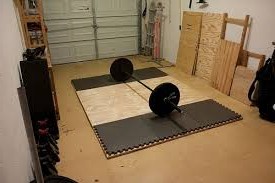
How to Build a Weightlifting Platform
Just like any weightlifting or gym equipment, a weightlifting platform can easily be built out of wood at home. If you have any experience in building something made out of wood, you will know very well the importance of following a step by step plan.
There are 12 very specific steps that need to be taken in a very specific order to ensure that you get the result that you expect. We will start will the essential requirements that you are going to need to get this done:
3 flat, unchipped wooden boards measuring 4’x8' that are as thick as the rubber matting you are going to be using.
2 flat pieces’ rubber matting measuring 2’x8
14 wood nails, the length of these nails will depend on thickness of the wooden boards you’re using. Liquid Nails should be used to secure this rubber matting to your platform once it is built.
2 tubs full of liquid nails
Caulking gun
Drill
Yard stick
Marker
Dust MaskSTEP 1:
Using liquid nails glue your two bottom boards together so that they align perfectly.
STEP 2:
With your yard stick and your marker measure off 2 feet from outside of the boards that are glued together. Do this both front and back of the platform plus both sides.
Place your third wooden board in the center of the 2 boards using the marks you made to ensure its centered correctly.
STEP 3:
Using the yard stick to mark where to drill the screws down so that the top board is symmetrically aligned. You should use 4 screws on the front and back of the platform and 3 screws going down the sides =14 skews total.
STEP 4:
Using the liquid nails glue the 2’x8' space on both sides, doing one side at a time.
STEP 5:
Now you can lay the 2’X8’ rubber mat down using liquid nails, making sure that it’s perfectly flush along the inside of the platform. Make sure you put some serious weight on-top of the rubber mat while it dries. Then repeat steps 4 and step 5 doing the same on the other side.
STEP 6:
You should put some painter’s tape on top of the rubber matting so that the rubber is protected while you’re sanding and painting.
STEP 7:
Wipe the wood using a damp cloth to rid any dirt or wood dust and allow the wood to start drying after it has been painted.
STEP 8:
Sanding the wood should be done progressively so that you start with about a 60 grit sanding, then move to 80 grit and finish off using 120 grit to make it as smooth as possible.
STEP 9:
You can use the 60 grit sandpaper on the rubber mats to smooth off the edges.
STEP 10:
After clearing the sanded platform of any wood dust you then start to paint it using wood stain. Make sure you avoid any clumping and that you spread out the stain using a brush.
STEP 11:
It’s a good idea to seal the platform using polyurethane and the same technique used as you did in step 10. Allow 3-4 hours to dry, then do an additional coat.
STEP 12:
You now can remove the painter’s tape you put on n Step 6:
You have now built a solid Olympic weightlifting platform, congratulations.
For more great build your own exercise equipment ideas checkout Fast & Easy Home Gym Plans
Health | Weight Loss | Exercise
Fitness Magazine | Articles | eBooks | Store | Personals | Forum | Contact
Click Here For Free World Fitness Magazine Subscription
DISCLAIMER: The material on this site is for informational purposes only and not intended to replace professional, medical recommendations or common sense. This site, owners and employees accept no responsibility for injury or damage arising from the use or misuse of the information provided..